
PPM to Voltage Calculator
Convert gas sensor readings from Parts Per Million (PPM) to analog voltage output (Vout) using calibration data from your sensor datasheet.
Gas Sensor PPM to Voltage Calculator – MQ Sensor Conversion Tool
Convert PPM readings into voltage using MQ-series gas sensor response curves. Perfect for Arduino, Raspberry Pi, IoT air-quality projects, and gas sensing calibration.
Have you ever worked with a gas sensor for a project and received a voltage reading, only to wonder, “What does this actually mean?” You’re not alone. That raw voltage is just a number until you convert it into a meaningful unit of concentration, like Parts Per Million (PPM). This is where a PPM to Voltage Calculator becomes an essential tool.
How to Use the PPM to Voltage Calculator
Our calculator is designed to be straightforward. To get an accurate PPM value, you need a few key pieces of information about your sensor and circuit. Let’s break down each input field.
Sensor Voltage (V)
This is the live voltage reading you get from your gas sensor’s analog output pin. When the sensor is exposed to a gas, its internal resistance changes, which in turn alters this output voltage. This value is the starting point for the entire calculation.
Load Resistance (R<sub>L</sub>) in kΩ
Your gas sensor module includes a “load resistor” (R<sub>L</sub>) that works in tandem with the sensor itself. Together, they form a circuit called a voltage divider. The value of this resistor is crucial for calculating the sensor’s own resistance. You can typically find this value printed on the resistor on your sensor board or in the module’s schematic. Common values are 5 kΩ or 10 kΩ.
Sensor Resistance in Clean Air (R₀) in kΩ
R₀ (R-zero) is a baseline measurement. It represents the resistance of your specific sensor in an environment with clean, fresh air. Because every sensor has slight manufacturing variations, you need to determine this value by running your sensor in clean air for a “burn-in” or calibration period (often 12-24 hours) and recording its resistance. This baseline makes your final PPM readings much more accurate.
Gas Curve Parameters (m, b)
This is the most critical, and often most confusing, part. The relationship between gas concentration and sensor resistance is not a straight line; it’s logarithmic. Sensor datasheets provide graphs showing this relationship for different gases. These graphs are plotted on a “log-log” scale. To use this in a formula, you need to determine the equation of the line for the specific gas you’re measuring.
- m (slope): This value represents the slope of the gas curve on the log-log graph.
- b (y-intercept): This value is the y-intercept of that same line.You can calculate these values by picking two points from the graph in the datasheet and using the formulas for a line’s slope and intercept.
This calculator is powered by PPMCalculator.com, delivering precise and efficient concentration and unit-conversion tools for scientific, industrial, and educational use.
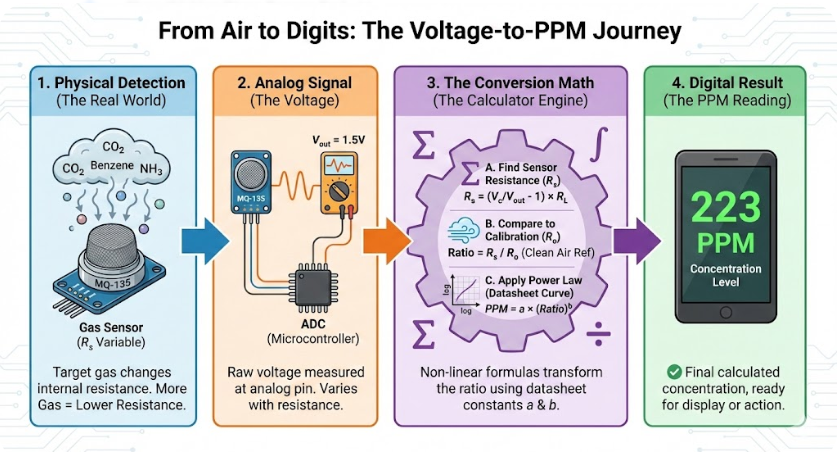
Formula & Conversion Explanation: The Science Behind the Numbers
So, how does the calculator turn a simple voltage into a precise PPM concentration? It’s a multi-step process rooted in basic electronics and a bit of algebra.
Step 1: Calculating the Sensor’s Live Resistance (Rₛ)
First, we need to figure out the sensor’s current resistance (Rₛ) in the presence of the gas. As mentioned, the sensor and the load resistor (Rₗ) form a voltage divider. Using Ohm’s law, we can derive a formula to find Rₛ:
Rₛ = ( (Vᵢₙ * Rₗ) / Vₒᵤₜ ) – Rₗ
- Vᵢₙ: The supply voltage for the circuit (typically 5V for Arduino and similar microcontrollers).
- Vₒᵤₜ: The “Sensor Voltage” you measured.
- Rₗ: The value of your load resistor.
This formula gives us the sensor’s electrical resistance at that exact moment.
Step 2: Finding the Critical Ratio (Rₛ/R₀)
The raw Rₛ value isn’t very useful on its own because it can be affected by ambient temperature and humidity. By calculating the ratio of the live sensor resistance (Rₛ) to its baseline resistance in clean air (R₀), we get a normalized value. This ratio is what you see on the X-axis of the sensitivity graphs in the sensor datasheet. It effectively cancels out environmental variables and isolates the effect of the gas.
Step 3: Converting the Ratio to PPM with a Logarithmic Formula
This is where the magic happens. Because the relationship is logarithmic, we use the formula for a line on a log-log plot to find the final PPM value. The standard formula for a line is y = mx + b. For a log-log scale, this becomes: log(y) = m * log(x) + b
In our case, ‘y’ is the PPM and ‘x’ is the Rₛ/R₀ ratio. So, the formula is: log(PPM) = m * log(Rₛ/R₀) + b
The calculator solves for PPM by taking the antilog (10 to the power of) of the result: PPM = 10 ^ (m * log(Rₛ/R₀) + b)
This final step converts the normalized resistance ratio into the gas concentration in Parts Per Million, giving you a meaningful and actionable measurement.
Applications & Use Cases
The ability to accurately convert sensor voltage to PPM is crucial in countless applications. Here are just a few examples:
- Home Air Quality Monitors: DIY and commercial devices use sensors to detect Volatile Organic Compounds (VOCs), smoke, and other pollutants, helping you maintain a healthy living environment.
- Carbon Monoxide (CO) Alarms: These life-saving devices rely on an accurate PPM reading to sound an alarm when CO levels become dangerously high.
- Gas Leak Detectors: A PPM to Voltage Calculator is at the heart of systems designed to detect flammable gases like methane (natural gas) or Liquefied Petroleum Gas (LPG).
- Breathalyzers: Alcohol sensors measure the ethanol concentration in a person’s breath, and the result is displayed in a unit derived from a PPM calculation.
- Industrial Safety: Factories and labs use sensors to monitor for hazardous chemical leaks, ensuring worker safety.
- Environmental Monitoring: Scientists use sensor arrays to track pollution levels in urban and rural areas.
Related Calculators and Resources
- EC to TDS/PPM Calculator
- TDS to PPM Calculator
- PPM Conversion Table
- PPM vs TDS vs EC
- How to Calculate PPM Step‑by‑Step
- PPM Accuracy Calculator
- PPM Solution Calculator
- PPM to Volume Calculator
- PPM to Weight Calculator
FAQs Section
1. What exactly is PPM (Parts Per Million)?
PPM is a unit of concentration. It tells you how many “parts” of a substance you have in a million parts of another substance. For gases, it means for every million gas molecules in a sample of air, a certain number of them are the gas you are measuring. For example, 50 PPM of Carbon Monoxide means there are 50 CO molecules for every 1,000,000 molecules of air.
2. Where do I find the ‘m’ and ‘b’ values for my sensor?
You must get these from the datasheet for your specific sensor (e.g., an MQ-135 for air quality, MQ-7 for CO). The datasheet will have sensitivity graphs for various gases. You need to pick two points on the line for the gas you want to measure and calculate the slope (m) and y-intercept (b) yourself. Online calculators can help you find ‘m’ and ‘b’ if you provide two (x, y) points from the graph.
3. How do I find R₀ for my sensor?
Finding R₀ requires a simple calibration process. You need to power on your sensor and let it run in an environment with fresh, clean air for an extended period (at least 12-24 hours is recommended for it to stabilize). Once stabilized, you use the Rₛ = ( (Vᵢₙ * Rₗ) / Vₒᵤₜ ) - Rₗ formula to calculate its resistance. This stable resistance value in clean air is your R₀.
4. Can I measure any gas with my sensor?
No. Each gas sensor is designed to be most sensitive to a specific set of gases. For example, an MQ-2 sensor is sensitive to methane, propane, and smoke, but it won’t be effective for measuring carbon dioxide. Always check the datasheet to see which gases your sensor can detect and find the corresponding sensitivity curve.
5. Why are my PPM readings fluctuating or seem inaccurate?
Several factors can cause inaccurate readings:
- Warm-up Time: Most MQ-series sensors require a warm-up period every time they are powered on. Readings taken before the internal heater is stable will be incorrect.
- Temperature and Humidity: These environmental factors can affect the sensor’s resistance. More advanced calculations sometimes include compensation factors for temperature and humidity.
- Incorrect R₀: An inaccurate baseline will throw off all subsequent calculations. Make sure you perform the clean-air calibration properly.
- Wrong Curve Parameters: Using the ‘m’ and ‘b’ values for the wrong gas will lead to completely incorrect PPM readings.
6. What’s the difference between Rₛ and Rₗ?
Rₛ (Sensor Resistance) is the variable resistance of the sensor itself, which changes based on gas concentration. Rₗ (Load Resistance) is a fixed-value resistor on the sensor module that completes the voltage divider circuit, allowing you to measure a voltage change.
7. Does a higher voltage mean more gas?
Not necessarily. It depends on the sensor type. For most MQ-series sensors, the presence of the target gas causes the sensor’s resistance (Rₛ) to decrease. In a typical voltage divider setup, a lower Rₛ results in a lower output voltage (Vₒᵤₜ). So, for these sensors, a lower voltage often means a higher gas concentration. Always refer to the datasheet to understand your sensor’s specific behavior.